Elver
| S | This is an article stub. | |
|---|---|---|
This article is lacking in information. You can assist by expanding it.
|
| ⚙ | This is curated content. | |
|---|---|---|
| This page contains community-made curated content that has been accepted into the game as either a permanent or timed addition. |
| Elver | |
|---|---|
 | |
| // GENERAL DATA | |
| Game mode | Survival |
| Map size | Medium (2048×2048 m2) |
| Release date | June 20, 2020 |
| Creators | Danaby2 Renaxon |
| Links | Steam Workshop |
| Large city in north-eastern Europe. Position in relation to Canada is currently unknown. Recommended for new survivors. | |
Elver is a curated playable map in Unturned. It takes place in a city of the same name, and the surrounding forests.
The map was created by Maciej "Renaxon" Maziarz and Daniel "Danaby2". It was released on June 20, 2020. The map's creators can be supported by purchasing the Elver Map Mystery Box, Elver Map Mystery Box II, Elver Map Bundle, or Elver Map Bundle II.
The map's creators collaborated on the map's development with—or gave special thanks to—Rolling Chair, Fleshy Pig, Sirady, Magical Burrito, SDGNelson, Manoman, Union, NSTM, AnimaticFreak, Tiway, MrObi, Timo987, Davidoz, P9nda, Pork "Funny Dog", Great Hero J "Otter", Squide "Impending Doom" and Nolan.
Locations
List of marked locations
| Name | Type | Description |
|---|---|---|
| Mall | Mall | A shopping mall near the center of the city. It consists of many small shops, which can spawn Graphic Cards and UPhones used to craft Components. |
| Demolition Site | Construction | A demolition site near the center of the city. Features 2 small buildings, a small road and a Deadzone entrance. In this location spawn Gyroscopes used to craft Components. |
| Park | Park | Small Park near the center of the city. |
| Fire Station | Fire Station | Fire station near the center of the city. Consists of two buildings connected to each other by a bridge. |
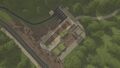
| Prison | Prison | Prison near the center of the city. Consists of main prison building, Police Station and 4 Towers. In the main Prison building is a Deadzone entrance. In this building can also spawn Key 4 for Dorms. |
| Town | Farm | An old farming town on the northwest side of the city. Features 8 barns, buildings and 1 floating house. To get to the floating house, you need to perform some simple parkour. The floating house contains Safezone entrance. In one of the barns spawns a Tank, to get inside that barn you will need to do the same parkour as before or destroy the barn wall. In the barn also spawns the Key 2 for the dorms. In one of the other buildings spawns Key 1 for the dorms. |
| Dorms | Civilian | Dorms on the east side of the city. Consists of 3 buildings. In the first building you can find a secret passage in a washing machine that leads to an underground church. Two of the three buildings lead to locked Dorm Rooms:
|
| Hospital | Medical | Hospital located on the South side of the city. Consists of 2 buildings connected by a bridge. In this location spawns Defibrillator Battery used to craft Components. |
| Fisherman's Grove | Civilian | Fisherman's Grove located on South West of the city. One of 3 places you can fish in. In one of the trash bins is Blue Keycard. |
| Junction 67 | Military | Junction 67 is a Military base located on South West of the city. This location features 2 Military barracks and a tower. In this location spawns Military Mega Zombie. This location also contains Deadzone entrance. |
| Military Checkpoint Alpha | Military | Military Checkpoint Alpha is a Military Checkpoint located on North side of the Main Road. This place consists of 2 Military barracks and a Tower. |
| Military Checkpoint Bravo | Military | Military Checkpoint Bravo is a Military Checkpoint located on South side of the Main Road. This place consists of 2 Military barracks, a Tower and a Mechanic Tent. In this place Military Helicopter has a chance to spawn. |
| Northern Tunnel | Military | Northern Tunnel is located on the North end of the Main Road. In this location is located White Keycard. |
| Southern Tunnel | Military | Southern Tunnel is located on the South end of the Main Road. In this location is located Purple Keycard. |
| Gas Station | Gas | Gas Station is located near the South end of the Main Road. This location consists of 2 buildings, Donut Shop and Gas Station. The basement of the main Gas Station building contains Safezone entrance. |
| Ghost Valley | Cultist | Ghost Valley is located in the South West corner of the map. The location serves as the designated Horde Beacon zone, and is the only location on the map where the player can place one. |
| Farm | Farm | Farm is located on the North West side of the map. Floating above this location is the Safezone Island. Also in this location is hidden Bunker D. |
List of bunkers (unmarked)
| Name | Type | Description |
|---|---|---|
| Bunker A | Bunker | Bunker A is located on the West side of the map. This bunker consists of 3 rooms: A hall, main room and a small room. To claim this bunker, you will need a hatch. |
| Bunker B | Bunker | Bunker B is located on the West end of the map. This bunker consists of 6 rooms: 2 halls, a main room with a fishing pond, two medium rooms and a small room. To claim this bunker, you will need a door. |
| Bunker C | Bunker | Bunker C is located on the South side of the map, near Gas Station. This bunker has 2 entrances. This bunker consists of 7 rooms: 2 halls, main room, medium sized room, two small rooms and a quarry. To claim this bunker, you will need a door. |
| Bunker D | Bunker | Bunker D is located on the North West side of the map, in the location Farm. This Bunker consists of 2 rooms: A main room and a small room. To claim this bunker, you will need a door. |
| Bunker E | Bunker | Bunker E is located on the North East side of the map. This bunker can be used as a garage. This bunker consists of 2 rooms: A large main room and a medium room. To claim this bunker, you will need a door and gate. |
| Bunker F | Bunker | Bunker F is located on the East side of the map. This bunker consists of 2 rooms: A hall and a main room. To claim this bunker, you will need any gate. |
| Bunker G | Bunker | Bunker G is located on the South East side of the map, near Military Checkpoint Bravo. This bunker is a staircase. This bunker consists of 8 rooms: 7 small rooms and a large staircase. To claim this bunker, you will need a door. |
| Bunker H | Bunker | Bunker H is located on the North side of the map, near Military Checkpoint Alpha. This bunker consists of 7 rooms: 6 hallways and a small main room. To claim this bunker, you will need a gate. |
Related achievements
|
|
Gallery
Images

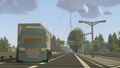
The first potential loading screen.

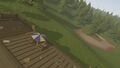
The second potential loading screen.
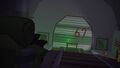
The third potential loading screen.
The fourth potential loading screen.
The fifth potential loading screen.
The sixth potential loading screen.
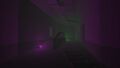
The seventh potential loading screen.
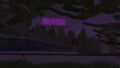
The eigth potential loading screen.
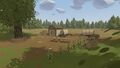
The ninth potential loading screen.

The tenth potential loading screen.
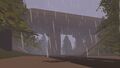
The eleventh potential loading screen.
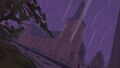
The twelfth potential loading screen.
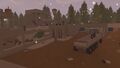
The thirteenth potential loading screen.
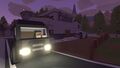
The fourteenth potential loading screen.
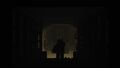
The fifteenth potential loading screen.

The sixteenth potential loading screen.
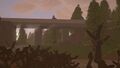
The seventeenth potential loading screen.
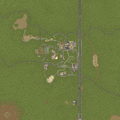
The GPS render of the map.

The Chart render of the map.


Videos
Trivia
- So far, Elver is the only curated map to be included in the Console Edition.